Kotlin with Maven

Java, kotlin, maven, programming

Stand-alone Programs

Instructions and template for a stand-alone Java program built with Kotlin source code.

An easy way to start with is, since JetBrains is behind this whole thing, just install and run their IntelliJ IDEA and create a new project from IntelliJ with the language set to Kotlin and build system set to Maven. Check the option to include a sample code. It should then flesh out a template project.
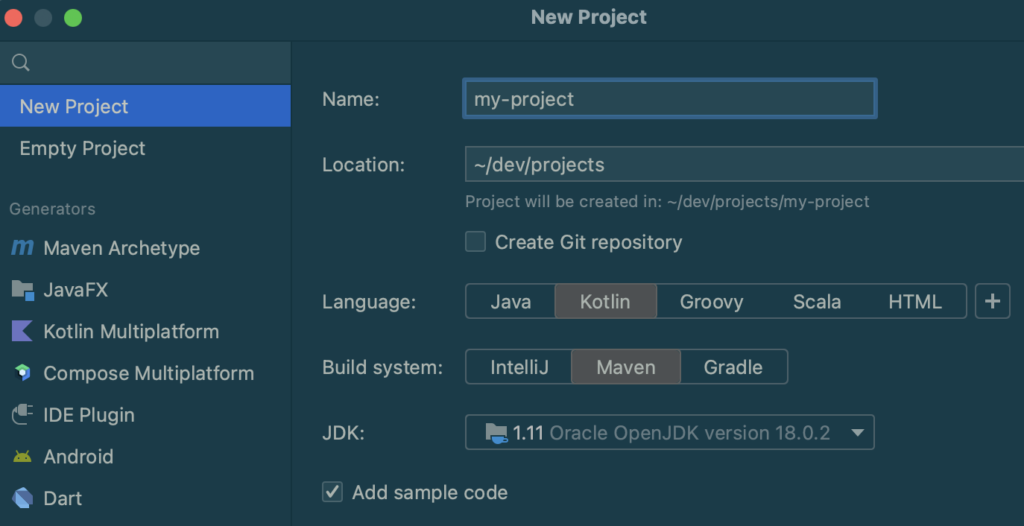
In the generated pom.xml file, make these modifications:

  • Add a property main.class that defines the main entry class to the generated MainKt class (so you don’t have to copy and paste into places).
  • Modify the exec-maven-plugin‘s mainClass to be ${main.class}.
  • Add the maven-assembly-plugin so that a stand-alone JAR will be created to be run.
  • Optional: Add the maven-compiler-plugin if you have Java code alongside Kotlin code.
<?xml version="1.0" encoding="UTF-8"?>
<project xmlns:xsi="http://www.w3.org/2001/XMLSchema-instance"
         xmlns="http://maven.apache.org/POM/4.0.0"
         xsi:schemaLocation="http://maven.apache.org/POM/4.0.0 http://maven.apache.org/xsd/maven-4.0.0.xsd">
    ...
    <properties>
        ...
        <main.class>MainKt</main.class>
    </properties>

    ...

    <build>
        <sourceDirectory>src/main/kotlin</sourceDirectory>
        <testSourceDirectory>src/test/kotlin</testSourceDirectory>
        <plugins>
            <plugin>
                <groupId>org.codehaus.mojo</groupId>
                <artifactId>exec-maven-plugin</artifactId>
                <version>1.6.0</version>
                <configuration>
                    <mainClass>${main.class}</mainClass>
                </configuration>
            </plugin>
            ...
            <plugin>
                <groupId>org.apache.maven.plugins</groupId>
                <artifactId>maven-compiler-plugin</artifactId>
                <version>3.5.1</version>
                <executions>
                    <!-- Replacing default-compile as it is treated specially by maven -->
                    <execution>
                        <id>default-compile</id>
                        <phase>none</phase>
                    </execution>
                    <!-- Replacing default-testCompile as it is treated specially by maven -->
                    <execution>
                        <id>default-testCompile</id>
                        <phase>none</phase>
                    </execution>
                    <execution>
                        <id>java-compile</id>
                        <phase>compile</phase>
                        <goals>
                            <goal>compile</goal>
                        </goals>
                    </execution>
                    <execution>
                        <id>java-test-compile</id>
                        <phase>test-compile</phase>
                        <goals>
                            <goal>testCompile</goal>
                        </goals>
                    </execution>
                </executions>
            </plugin>
            <plugin>
                <groupId>org.apache.maven.plugins</groupId>
                <artifactId>maven-assembly-plugin</artifactId>
                <version>3.4.2</version>
                <executions>
                    <execution>
                        <id>make-assembly</id>
                        <phase>package</phase>
                        <goals> <goal>single</goal> </goals>
                        <configuration>
                            <archive>
                                <manifest>
                                    <mainClass>${main.class}</mainClass>
                                </manifest>
                            </archive>
                            <descriptorRefs>
                                <descriptorRef>jar-with-dependencies</descriptorRef>
                            </descriptorRefs>
                        </configuration>
                    </execution>
                </executions>
            </plugin>

Building

Just running mvn install should build the stand-alone JAR:

  • target/<your project name>-1.0-SNAPSHOT-jar-with-dependencies.jar

Running

As a stand-alone JAR

To run the stand-alone JAR as a Java program:

java -jar target/<project name>-1.0-SNAPSHOT-jar-with-dependencies.jar ...

where ... are any arguments (args) you want to pass to the program.

With Maven

Because by default IntelliJ added the plugin exec-maven-plugin, the program can also be run without having to build the JAR. This is useful during development before deployment:

mvn exec:java -Dexec.args="..."

Notice that passing arguments to the program is a bit cumbersome due to the way Maven works (using the -Dexec.args property).

Deployment

The easiest way to deploy is to copy that target/<project name>-1.0-SNAPSHOT-jar-with-dependencies.jar to where you want to deploy the program. Renaming the JAR file to be something shorter helps. Also: changing the version in the POM file to a production SemVer value will get rid of that “SNAPSHOT” suffix.

More MVN Repository Notes

maven

More findings from working with MVN repository

When mvn release:perform is run, there are two steps that I didn’t pay attention to before. Of course, the building, signing, and uploading of JARs/POMs to the staging repository is expected from the various updates to the POMs seen from the previous post.

Here are the steps:

  • Creation of a staging repository
  • Building, signing, and uploading artifacts into the staging repository
  • Closing the staging repository
  • Releasing the staging repository

Looking at the logs of the release more closely, this can be seen:

...
    [INFO]  * Upload of locally staged artifacts finished.
    [INFO]  * Closing staging repository with ID "comtherealvan-1016".
         
    Waiting for operation to complete...

    ........                                                                                                              
    [INFO] Remote staged 1 repositories, finished with success.                    
    [INFO] Remote staging repositories are being released...                                                                                     
    Waiting for operation to complete...                                           
    .......                                                                                                               
    [INFO] Remote staging repositories released.             
    [INFO] ------------------------------------------------------------------------
    [INFO] BUILD SUCCESS                                     
    [INFO] ------------------------------------------------------------------------
    [INFO] Total time: 01:39 min
...

Parent POMs

Yep. More notes about parent POMs that have <packaging>pom</packaging> and global props that submodules inherit:

Closing and releasing have to be done manually

A staging repository will be created. However, I have to log into https://oss.sonatype.org/ and look up the staging repository (I just search for my group ID “therealvan.com” to find my artifacts).

Then I have to select my staging repository and click “Close” and then, after it successfully closes, click “Release” to release the repository. There is also a “Drop” to remove the staging repository when it’s no longer needed (e.g. clean up after a successful release or aborting a release).

More information is expected

For parent POMs, I ran into errors when trying to close the staging repository. They have to do with missing:

  • Developer information
  • Licensing information
  • Project description
  • Project URL

These do not seem to be required (at least for now) when the closing and releasing are done as part of mvn release:perform. However, when closing the staging repository manually, these come up as errors.

Fortunately, they are easy to fix:

  • Developer information can be provided using the <developers> section in the POM.
  • Licensing information can be provided using the <licenses> section in the POM.
  • Project description and URL are just <description> and <url> tags for the top-level <project>.


Publishing a Java project into MVN Repository

Java, maven, programming

It turns out that this is quite an involved process with a lot of configuration and coordination w/ Sonatype. It took several days, upwards to a week or so, for me to get this working. Plan accordingly.

These notes are based on various articles out there, but updated to reflect learnings I had when going through the process.

Qualifications:

Here are some specifics for my project.

  • Project is hosted in GitHub as a public repo.
  • Project is a Maven project with a POM file at the root. It’s a multi-module project, but that shouldn’t change anything other than the fact that I publish the modules individually. There may be a way to publish all the modules simultaneously, but I haven’t explored that option.

Prerequisite:

  • Create an account with Sonatype. Start at https://issues.sonatype.org/secure/Dashboard.jspa and click “Sign up.”
  • Create an issue for the new project:
    • Project: “Community Support – Open Source Project Repository Hosting”
    • Type: “New Project”
    • Group Id: a domain I own (or something based on the project hosting like io.github.<user narme> or com.github.<user name>.
    • Project URL: GitHub URL to the project.
    • SCM URL: path to the repo (https://github.com/…/<project>.git)
    • Username(s): the Sonatype user name.

Configure project with Maven src and Javadoc plugins:

See https://github.com/bluedenim/log4j-s3-search/blob/master/appender-core/pom.xml#L106-L134

Create and publish an RSA key

  • Create a RSA key (e.g. using GnuPG’s “gpg –full-gen-key with 2048 bits)
  • Publish the key (e.g. “gpg –keyserver pool.sks-keyservers.net –send-key <my RSA key ID>“)

Configure Maven to talk to Sonatype servers:

Create/edit the file settings.xml under M2_HOME/config or M2_REPO/config:

Find the servers section and add:

<server>
  <id>ossrh</id>
  <username>my_sonatype_username</username>
  <password>my_sonatype_password</password>
</server>

Find the profiles section and add:

<profile>
  <id>ossrh</id>
  <activation>
    <activeByDefault>true</activeByDefault>
  </activation>
  <properties>
    <gpg.keyname>my RSA key ID</gpg.keyname>
    <gpg.passphrase>my RSA key's passphrase</gpg.passphrase>
  </properties>
</profile>

Use the same GPG key generated above.

Configure project for Maven DEPLOY Plugin:

Add the Maven Deploy Plugin. See https://github.com/bluedenim/log4j-s3-search/blob/master/appender-core/pom.xml#L64-L76

Add a distributionManagement section to the project POM. See https://github.com/bluedenim/log4j-s3-search/blob/master/appender-core/pom.xml#L137-L146

Add an scm section to the project POM. See https://github.com/bluedenim/log4j-s3-search/blob/master/appender-core/pom.xml#L147-L152

Configure Project for Nexus-Staging-Maven Plugin:

See https://github.com/bluedenim/log4j-s3-search/blob/master/appender-core/pom.xml#L95-L105

If using a different server ID than “ossrh,” keep in sync with the entries defined in the distributionManagement section and also the configuration in the Maven conf/settings.xml.

Configure project for Maven Release Plugin:

Add the Maven Release Plugin. See https://github.com/bluedenim/log4j-s3-search/blob/master/appender-core/pom.xml#L77-L94

Configure Project to Sign artifacts when releasing:

See https://github.com/bluedenim/log4j-s3-search/blob/master/appender-core/pom.xml#L154-L180

Preparation of Release:

Finally, to prepare for a project to be released,

  • Build the project once with mvn install
  • Fix all the issues that come up with unit tests and Javadoc.
  • Commit and push all the changes to GitHub.
  • Modify the project’s version to be a “-SNAPSHOT” release for the release I want to make. For example, if I want to release a 1.0.0 version, use the version “1.0.0-SNAPSHOT” for the project. However, none of the project’s dependencies can be to SNAPSHOT versions.
  • Commit the change. No need to push to GitHub.

Run mvn release:prepare

The process will ask some questions. The release will be “1.0.0” in this example. The next release is probably “1.0.1-SNAPSHOT” as suggested, but this can always be modified later as needed.

Release TO SONATYPE:

Run mvn release:perform

This takes a while, and it will actually push artifacts to Sonatype’s servers. Things can go wrong here that range from intermittent network errors to errors with the setup of the repo.

Artifacts can be verified by logging into https://oss.sonatype.org/ with the Sonatype account created earlier and searching for the released artifacts.

Issues may need to be filed with Sonatype if the repo is set up incompletely. Even when things work correctly, it may take some time for things to propagate through the various servers before the artifacts show up in mvnrepository.com.

Once this works the first time, subsequent releases are more stable.


Addendum:

Parent POMs

To release parent POMs w/o triggering releasing the modules under the parent, add:

 -N -Darguments=-N

as documented here: http://maven.apache.org/maven-release/maven-release-plugin/faq.html#nonrecursive


Spring Boot w/ JSP

Java, maven, programming, Spring Boot

Project Setup

From the CLI or http://start.spring.io/, initialize a project with “web” capability.  What ends up happening is addition of the dependency:

<dependency>
  <groupId>org.springframework.boot</groupId>
  <artifactId>spring-boot-starter-web</artifactId>
</dependency>

Start with this directory structure. Be sure the controller (and any other Spring beans) are located under where the Application class (JspDemoApplication in this example) is.

...
  src/
    main/
      java/
        org/
          van/
            jspdemo/
              JspDemoApplication.java
              controller/
                DemoController.java
      resources/
        application.properties
      webapp/
        WEB-INF/
          jsp/
            demoindex.jsp

Controller and View

Add a controller file DemoController.java (see tree above for location):

...

@Controller
@RequestMapping("/jspdemo")
class DemoController { 
  @RequestMapping("/index")
  public String index(@RequestParam("name") String name, Model model) {
    model.addAttribute(name.toUpperCase());
    return "demoindex";  // view/JSP name
  }
}

Then the view file demoindex.jsp (see tree above for location). NOTE that the webapp/WEB-INF/jsp subdirectory needs to be created.

<html>
  <div>
    Hello, ${name}.
  </div>
</html>

Add support for JSP

Add these dependencies:

<dependency>
  <groupId>org.apache.tomcat.embed</groupId>
  <artifactId>tomcat-embed-jasper</artifactId>
  <scope>provided</scope>
</dependency>
<dependency>
  <groupId>javax.servlet</groupId>
  <artifactId>jstl</artifactId>
  <scope>provided</scope>
</dependency>

Add these to application.properties:

spring.view.prefix: /WEB-INF/jsp/
spring.view.suffix: .jsp

SampleServlet: Java web app starter

Java, jetty, maven, programming

Prerequisite

Maven 3.x installed – try http://maven.apache.org/download.cgi
Important: earlier versions of Maven, such as 2.x, won’t work correctly

Set-up

Locate a subdirectory and run:

mvn archetype:generate

When prompted, use maven-archetype-quickstart as the archetype to use.  Enter the groupId, artifactId, version, etc.

Add dependencies and plugins into pom.xml

A relatively useless pom.xml file is generated.  Modify it to include some dependencies and plugins:

<project xmlns="http://maven.apache.org/POM/4.0.0"
xmlns:xsi="http://www.w3.org/2001/XMLSchema-instance"
xsi:schemaLocation="http://maven.apache.org/POM/4.0.0 http://maven.apache.org/maven-v4_0_0.xsd">
<modelVersion>4.0.0</modelVersion>
<groupId>org.van</groupId>
<artifactId>sampleweb</artifactId>
<packaging>jar</packaging>
<version>1.0</version>
<name>sampleweb</name>
<url>http://maven.apache.org</url>
<dependencies>
<dependency>
<groupId>junit</groupId>
<artifactId>junit</artifactId>
<version>3.8.1</version>
<scope>test</scope>
</dependency>

<dependency>
<groupId>javax.servlet</groupId>
<artifactId>servlet-api</artifactId>
<version>2.5</version>
</dependency>
</dependencies>

<build>
<finalName>sampleweb</finalName>
<plugins>

<plugin>
<groupId>org.apache.maven.plugins</groupId>
<artifactId>maven-compiler-plugin</artifactId>
<version>2.0.2</version>
<configuration>
<source>1.6</source>
<target>1.6</target>
</configuration>
</plugin>
<plugin>
<groupId>org.mortbay.jetty</groupId>
<artifactId>jetty-maven-plugin</artifactId>
<configuration>
<contextPath>/</contextPath>
</configuration>
</plugin>

</plugins>
</build>
</project>

Add web.xml per Java Servlet specs

Create the subdirectory src/main/webapp/WEB-INF/ and add into it <strong?web.xml:

<?xml version="1.0" encoding="UTF-8"?>
<web-app xmlns="http://java.sun.com/xml/ns/javaee"
xmlns:xsi="http://www.w3.org/2001/XMLSchema-instance"
xsi:schemaLocation="http://java.sun.com/xml/ns/javaee http://java.sun.com/xml/ns/javaee/web-app_2_5.xsd"
version="2.5">
<servlet>
<servlet-name>SampleServlet</servlet-name>
<servlet-class>org.van.SampleServlet</servlet-class>
</servlet>

<servlet-mapping>
<servlet-name>SampleServlet</servlet-name>
<url-pattern>/SampleServlet/*</url-pattern>
</servlet-mapping>
</web-app>

Create SampleServlet.java

Under src/main/java/, delete the App.java generated and add the servlet file under the appropriate package subdirectory (e.g. “org/van/SampleServlet.java”):

package org.van;

import javax.servlet.ServletException;
import javax.servlet.http.HttpServlet;
import javax.servlet.http.HttpServletRequest;
import javax.servlet.http.HttpServletResponse;

public class SampleServlet extends HttpServlet {
/*
Redirects to some other page. Sample usage:
http://localhost:8080/SampleServlet?destination=http://www.therealvan.com
*/
public void doGet(HttpServletRequest req, HttpServletResponse resp)
throws ServletException, java.io.IOException {

String dest = req.getParameter("destination");
resp.sendRedirect(dest);
}
}

Run

Just invoke the Jetty run command:

mvn jetty:run

Zip of starter project

Here is a zip of the starter project to extract wherever to get started:
sampleweb.zip

Details

The sample project uses the following:

  • Java Servlet 2.5 API
  • Maven compiler plugin
  • jetty-maven-plugin